(Also available in WeScheme)
Students explore image transformation and composition, applying their knowledge of ratios and coordinates to scale and position shapes precisely while recreating images of flags of varying complexity.
Lesson Goals |
Students will be able to:
|
Student-facing Goals |
|
Materials |
|
Supplemental Materials |
|
Preparation |
|
🔗Putting Images Together 20 minutes
Overview
Students learn about the put-image function, which uses coordinates to position one image on top of the other. Students think through what coordinates will place a solid red circle on top of a rectangular background, in a variety of different locations.
Launch
As you’ve already seen, overlay sticks two images together, so that the center of the first image is placed exactly on top of the center of the second image. But what if we want to put the dot somewhere besides the center?
Instead of centering the top image on the bottom image, the put-image function specifies where on the bottom image to place the center of the top image.
Think of the background image as a sheet of graph paper with the origin (0,0) in the bottom left corner.
The numbers in put-image specify the point on the paper where the center of the top image should be placed.
-
Turn to Making Sense of Coordinates.
-
The code beneath each image is missing the x and y coordinates specifying where to place the dot.
-
Use logic and proportional reasoning to identify what the x- and y-coordinate of the dot’s location should be for each image to complete the code!
-
What strategies did you use to estimate the coordinates?
-
Answers will vary, but make sure the conversation is anchored around the fact that the background is 300x200.
-
Investigate
Let’s apply what we just learned about put-image to getting the Japanese flag building correctly.
We’re about to look at some code in the Flags Starter File. The programmer included a series of special lines in this file - called comments - that will never be read by the computer. Comments are a way for programmers to leave notes for one another, and even for a single programmer to keep track of their own thinking for when they come back to their code another day.
Professional programmers use comments all the time!
Most professional programmers work with teams who need to be able to follow each other’s thinking in order to collaborate efficiently. And many programs are written and maintained by a series of people, who come and go over the years, and need to able to follow each other’s thinking even if they never meet each other!
-
Open the Flags Starter File and click "Run".
-
Turn to Investigating put-image and complete the first section (titled Japan).
For students who finish early, there is an optional extension activity in this starter file about writing code to generate the image of the flag of Somalia, but there are many more flags and starter files to come so don’t hold up your class for students to work on it.
Synthesize
Could we completely replace overlay with put-image? Why or why not?
🔗Transforming Shapes for Composition 30 minutes
Overview
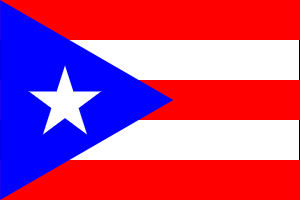
Students will use proportional reasoning to determine what sizes various flag components should be and where to position them. The first starter file builds reasoning with classic three-stripe flag designs. The second starter file focuses on the Puerto Rican flag and will support students in understanding much more complex designs.
Launch
-
Open the Flags of Netherlands, France & Mauritius Starter File and click "Run".
-
Complete the second section of Investigating put-image, titled The Netherlands.
-
When you’ve answered all of the questions, continue working through the starter file.
The primary goal of this file is for students to practice thinking about the dimensions of flag stripes as fractions of the full dimensions of the flag. There are many sections of this starter file, and some students will make it through the challenges. Some students may only complete one flag. All of them will be using their proportional reasoning, and synthesizing how to apply put-image to locate images on the coordinate grid.
Investigate
Now that we’ve mastered the most basic flag forms, we’re ready to tackle a more complex design.
-
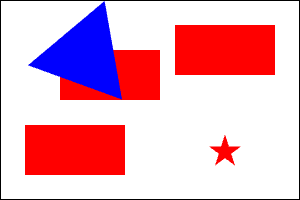
We’re going to transform a pile of mis-defined shapes into the flag of Puerto Rico by fixing the code.
-
Open the Flag of Puerto Rico Starter File and click "Run".
-
With your partner, follow the "Do Now" directions in the commented code.
|
→ |
|
Synthesize
Why is it useful to define each part of the flag first, before stitching the images together?
🔗Decomposing Flags optional
Overview
Students practice decomposing flags into the pieces they are made of and determining the size and coordinates of those pieces.
If you are doing Project: Make a Flag, decide whether you want this to come before or after students write the code to make their own flags. If it comes before, it will require more scaffolding. If it comes after, we would expect students to have developed understanding with which to engage with these materials more independently.
Launch
For this activity, you will want to project the color version of Decomposing Flags. Otherwise, students with black-and-white photocopies will be unable to identify the colors on the the flags.
-
Turn to Decomposing Flags. What do you Notice? What do you Wonder?
-
We are going to talk through how to fill in the table for the Cameroon flag. But, take a few minutes and see how much of this page you can complete on your own first.
Investigate
-
How big is the Cameroon flag?
-
450 x 300
-
-
Let’s complete the first row of the table focusing on the green rectangle.
-
How could we determine the width of the green rectangle?
-
It’s 1/3 the width of the whole flag so we need to divide 450 by 3 to get 150.
-
Note: 150 is a pretty friendly number, but sometimes division results in long or repeating decimals, and it’s a place where we humans might make mistakes. When we’re writing code, we don’t have to actually do the division. We can just code the division problem
450 / 3and leave it for the computer to evaluate!
-
-
How could we determine the height of the green rectangle?
-
It’s the same as the height of the flag, which is 300.
-
-
How could we determine the x and y-coordinates that will place the center point of the green rectangle correctly on the flag?
-
Since the bottom left corner of the flag is (0,0) and the bottom left corner of this particular rectangle is also at (0,0) we just need to find the middle of its width (150) and height (300).
-
The coordinates for locating the center point of the green rectangle on the flag should be (75,150).
-
-
The shape, color, width and height for the red rectangle will be the same as for the green rectangle.
-
How could we determine the x and y-coordinates that will place the center point of the red rectangle correctly on the flag?
-
Its center should go on the middle of the flag. Since the bottom left corner of the flag is (0,0) we just need to find the middle of its width (450) and height (300).
-
The coordinates for locating the center point of the red rectangle on the flag should be (250,150).
-
-
The shape, color, width and height for the yellow rectangle will also be the same as for the green rectangle.
-
How could we determine the x and y-coordinates that will place the center point of the yellow rectangle correctly on the flag?
-
The y-coordinate will be the same as the others, but finding the x-coordinate for placing this rectangle correctly is much trickier than it was for the others!
-
One way to think about it is to imagine that if all 3 vertical stripes were split in half, the middle of the yellow rectangle would be located at 5/6 the width of the flag
5 * (450 / 6). -
Another way to think about it is that if the center of the green rectangle was 75 pixels from the left edge, the yellow rectangle will be located 75 pixels from the right edge. 450 - 75 = 375
-
The coordinates for locating the center point of the red rectangle on the flag should be (250,150).
-
Synthesize
-
What strategies did you use for finding the length and width of the flag components?
-
What strategies did we use for determining the x and y coordinates where flag components should be placed?
🔗Additional Exercises
-
Flags and other images (Desmos) - Match official flag ratios to code defining background rectangles with corresponding proportions. Then match images to code using
overlayandput-image. -
Coding and Designing the Alaskan Flag - This page engages students with the Flag of Alaska Starter File for a quick dive into why it’s more efficient to define shapes before building the image.
-
Flag of Lebanon Starter File - For practice scaling imported graphics
-
Flag of Mexico Starter File - Similar to the Puerto Rico Flag Starter File, but this one involves an imported image
-
Flag of Turkey Starter File - For a fun function-composition puzzle
-
Flag of Trinidad and Tobago Starter File - If you’ve already studied Pythagorean Theorem and are ready to apply it
These materials were developed partly through support of the National Science Foundation, (awards 1042210, 1535276, 1648684, 1738598, 2031479, and 1501927).  Bootstrap by the Bootstrap Community is licensed under a Creative Commons 4.0 Unported License. This license does not grant permission to run training or professional development. Offering training or professional development with materials substantially derived from Bootstrap must be approved in writing by a Bootstrap Director. Permissions beyond the scope of this license, such as to run training, may be available by contacting contact@BootstrapWorld.org.


